This tutorial is in reference to how teleportation works in my VR Game - NYU Capstone Project. In that game you are given a polaroid camera that you can use to take pictures. Those pictures activate the several large polaroid portals located around the level. Flying through the portals teleports you back to where the picture was taken.
Although these portals were made for Unity VR, they can easily be used in 3D and 2D with little to no tweaking. They work with colliders meaning that all you have to do to activate them is walk through them (aka collide with them). The static portals will stay in place while the dynamic portals will track your movement in order to face you for a more seamless interaction.
Shown below is the static portal and dynamic portal we are going to be making followed by a look at a fully incorporated version from my NYU Capstone Project.
Index
1 - Adding Locomotion, Continuous Movement and Snap Turns
2 - Setting Up the Portal GameObject
3 - Setting Up TPTrigger GameObject
4 - PortalManager Script
5 - Ideas and Improvements
1 - Adding Locomotion, Continuous Movement and Snap Turns
This builds off of the base of the Setting Up Unity VR tutorial (I also kept the Interactor Hands in the downloadable package from the Interactions in Unity VR tutorial just in case you’d like to use them). Skip this section if you’d like to go straight into building the portal.
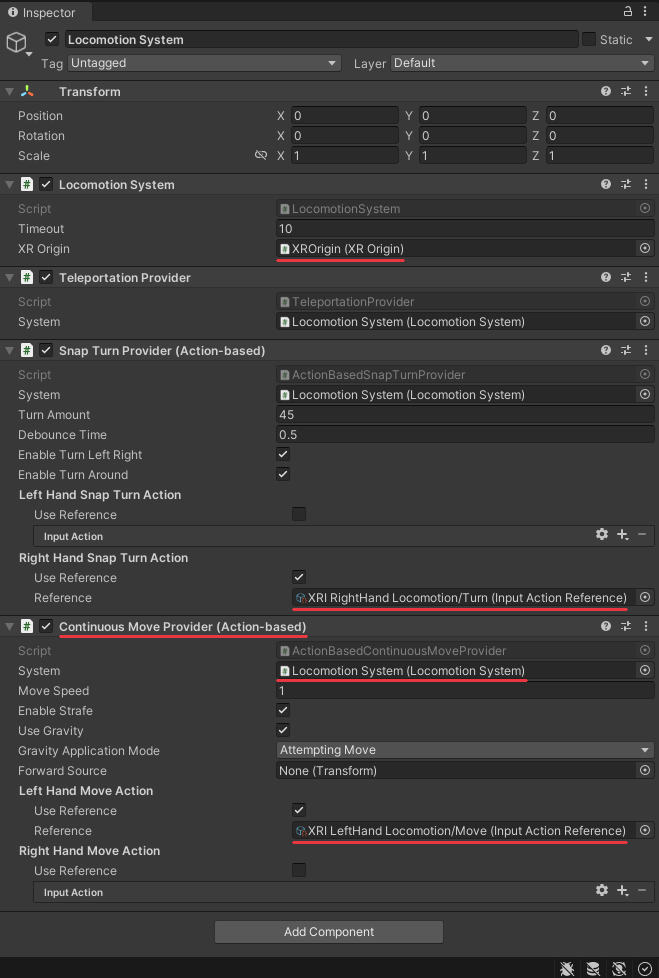
Left click in the Hierarchy, navigate to and add an XR > Locomotion System (Action Based). In the Locomotion System component of the just added Locomotion System GameObject make sure to reference the XROrigin.
In the Snap Turn Provider (Action-based) component use and add a reference to the Right Hand’s Snap Turn Action [ XRI RightHand Locomotion/Turn (Input Action Reference) ] in order to snap your VR body left/right with the right joystick by the predetermined Turn Amount (default is 45 degrees).
Add a Continuous Move Provider (Action-based) component to the Locomotion System Game Object and reference the Locomotion System GameObject as the System used. Also use and add a reference to the Left Hand’s Move Action [ XRI LeftHand Locomotion/Move (Input Action Reference) ] in order to move your VR body with the left joystick.
The Locomotion System GameObject with everything added should look like this:
2 - Setting Up the Portal GameObject
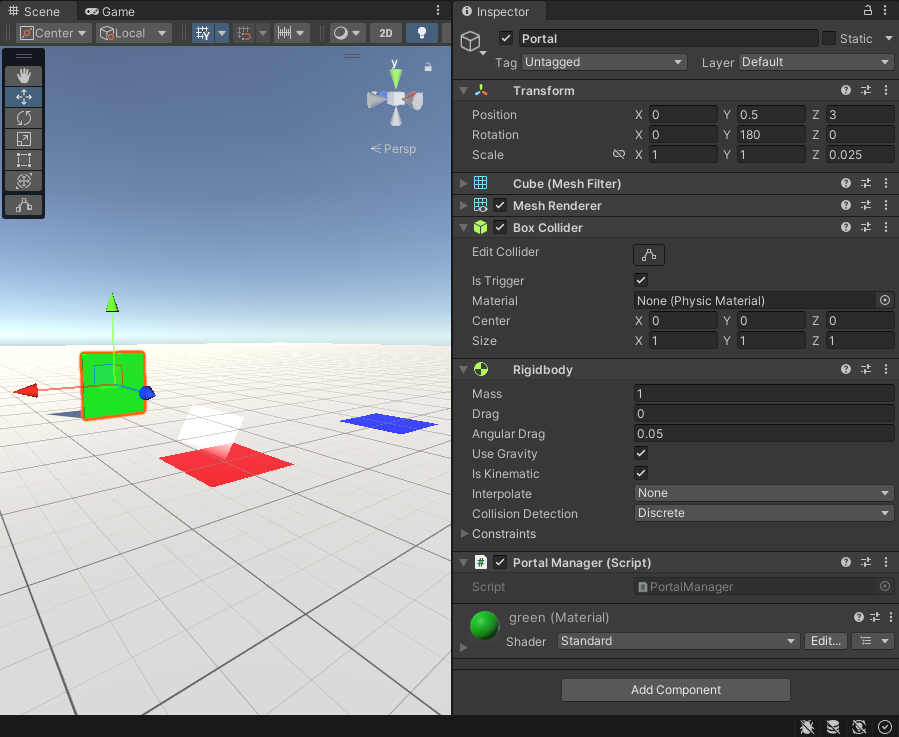
Create or add a portal object, I’ll be using a flatten cube named ‘portal’ with a green material. The portal object will need a collider with its ‘Is Trigger’ box checked and a Rigidbody with its ‘Is Kinematic’ checked (so it stays anchored in place unaffected by external forces and so we can move in script). Create a new script named “PortalManager” saved in the Scripts folder and add it as a component to your portal. Whenever the player hits the collider on the portal it will trigger the teleporting which will be done through script.
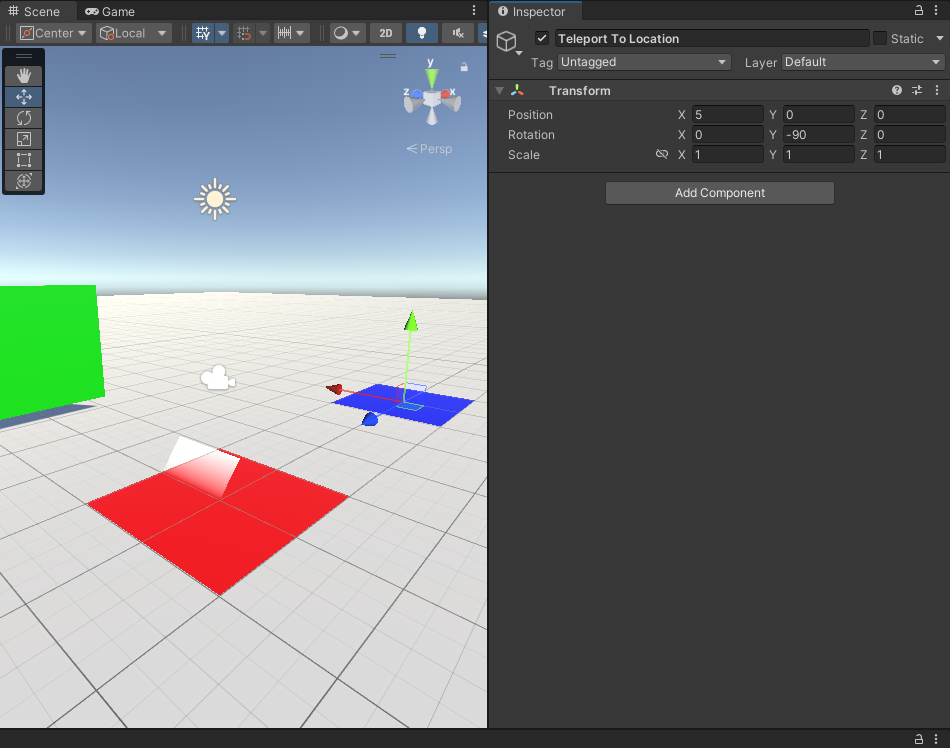
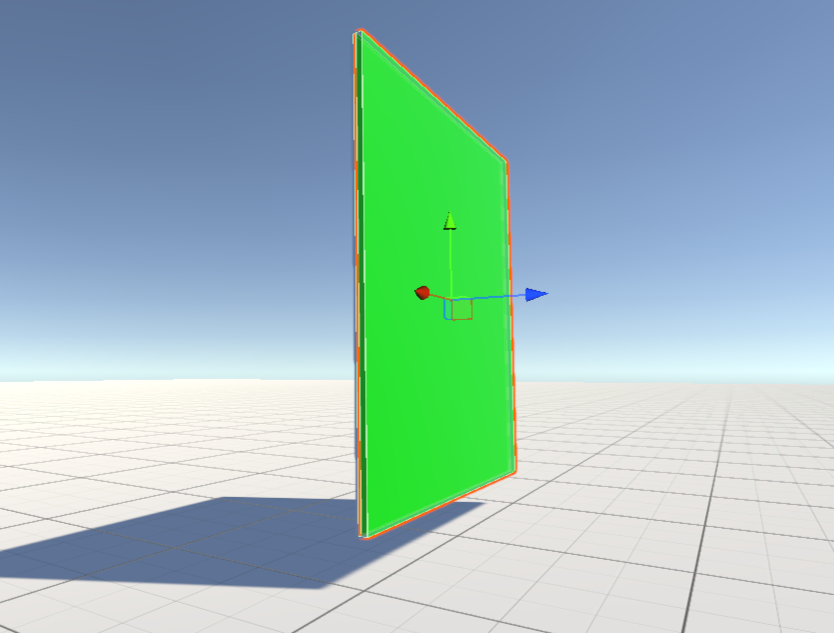
Additionally create an empty object and name it “Teleport To Location”. We’ll be using later in the script as a reference to where the portal should teleport you to. I set mine on top of the blue quad with the blue forward vector facing the red quad so that the player faces that after teleporting.
3 - Setting Up TPTrigger GameObject
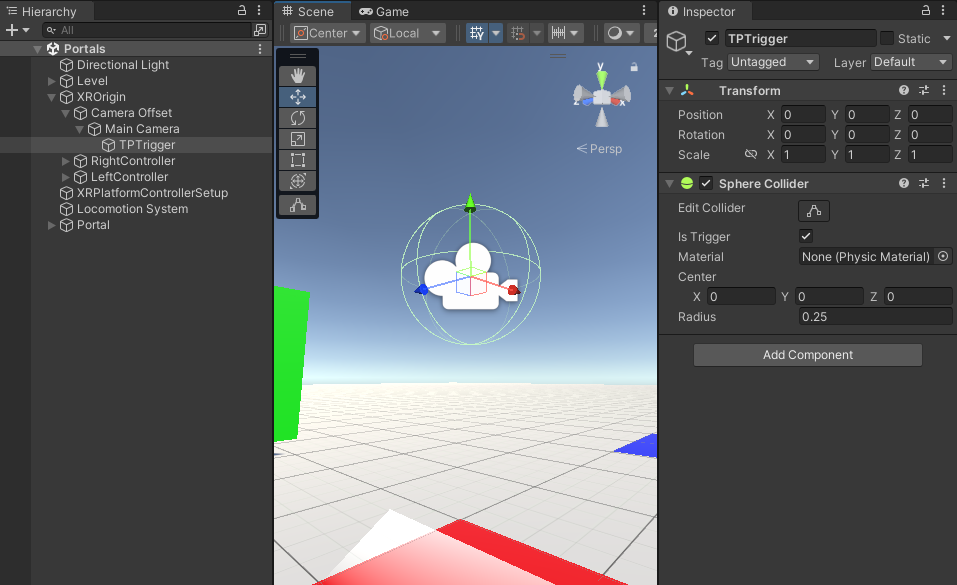
We now need to set up the trigger that will collide with the portal box collider trigger. Being teleported when your head goes through the portal made the most sense to me so we’ll make the trigger area around the Main Camera.
Left click on the Main Camera in the XROrigin and Create Empty object named ‘TPTrigger’. Add a Sphere Collider component and resize it to roughly the size you think a head would be. Make sure the collider’s ‘Is Trigger’ box is checked.
As is our Portal will be triggered by any object that has a collider with ‘Is Trigger’ checked. ‘TPTrigger’, both hand controllers, and the balls from earlier tutorials all meet this requirement. To ensure that only objects we want to teleport do teleport, we’re going to add a second requirement in the form of a Tag.
Create a new Tag by clicking the ‘Tag’ dropdown box, then ‘Add Tag…'. Click the + button under ‘Tags’ to add a new one, name it “Teleportable”, and click Save. Under the original ‘Tag’ dropdown box select the newly created “Teleportable” Tag.
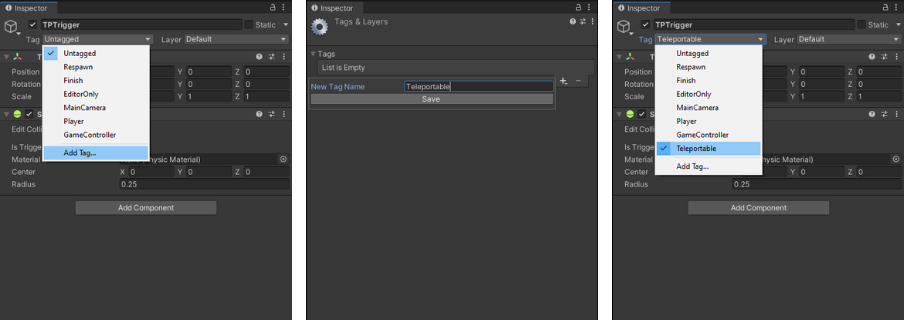
Now any object with a collider set to ‘Is Trigger’ and with the ‘Teleportable’ tag will be able to teleport through the Portal.
4 - PortalManager Script
This section will start by building a basic static portal and then, if it fits your game, will add more code to make it a dynamic portal like the one I use in my VR Game - seen above.
Static Portal
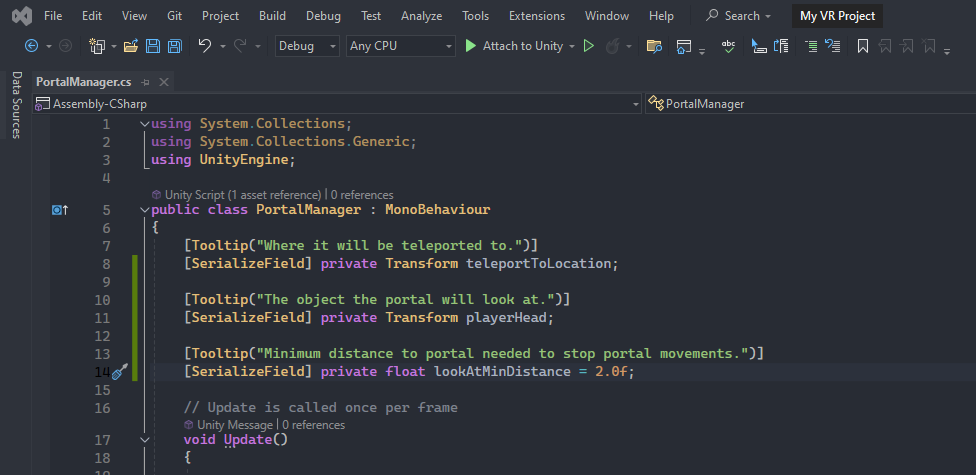
Open up the PortalManger script we added to the Portal GameObject, delete Start() we won’t be using, and add the following variable. It’s set to private so that no other script can edit it and is tagged with [SerializeFeild] to allow us to set it from inside the Editor.
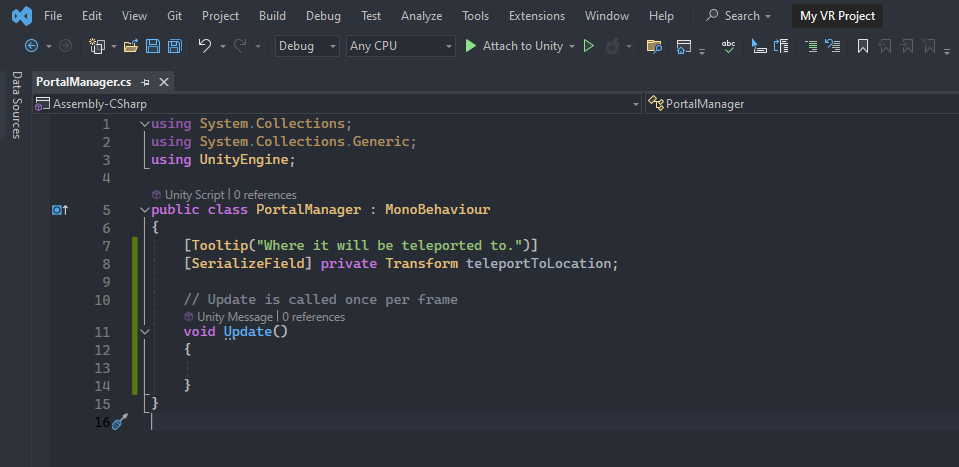
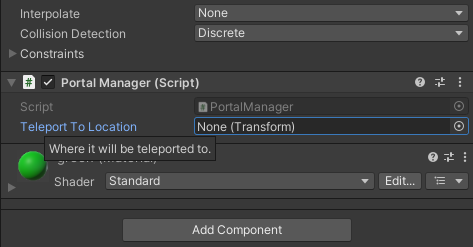
Quick Tip 1 - [Tooltip(“...”)]: Tooltips aren’t necessary but are nice to have. When we hover over a variable in the Editor we can now see what the variable is going to be used for like a hint or a note.
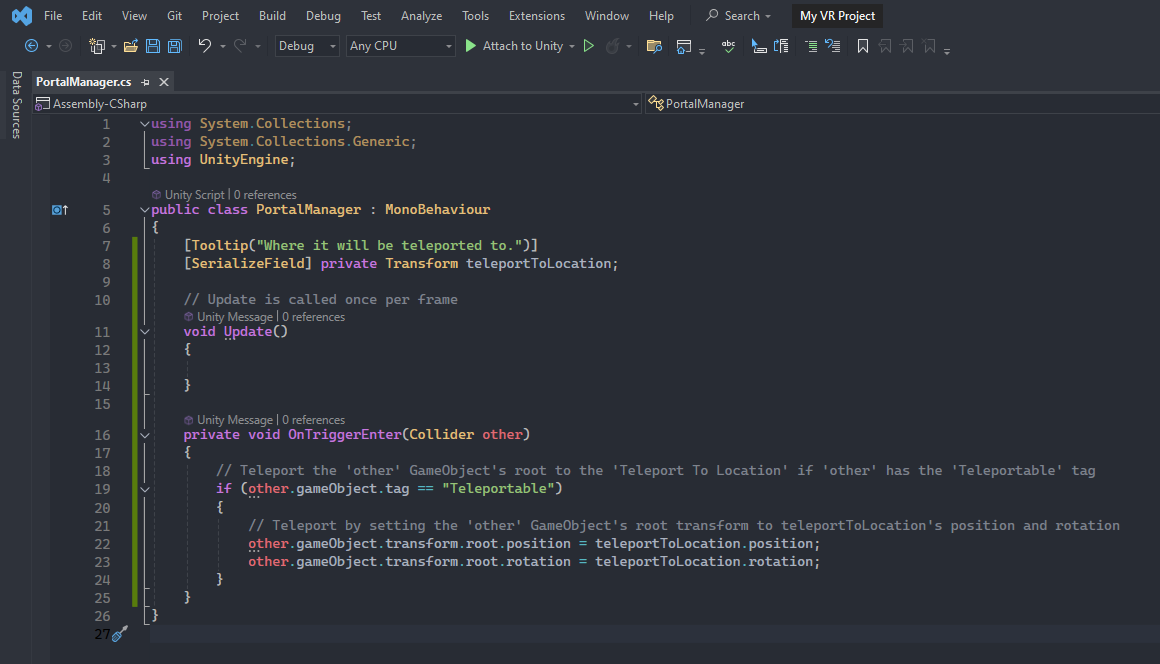
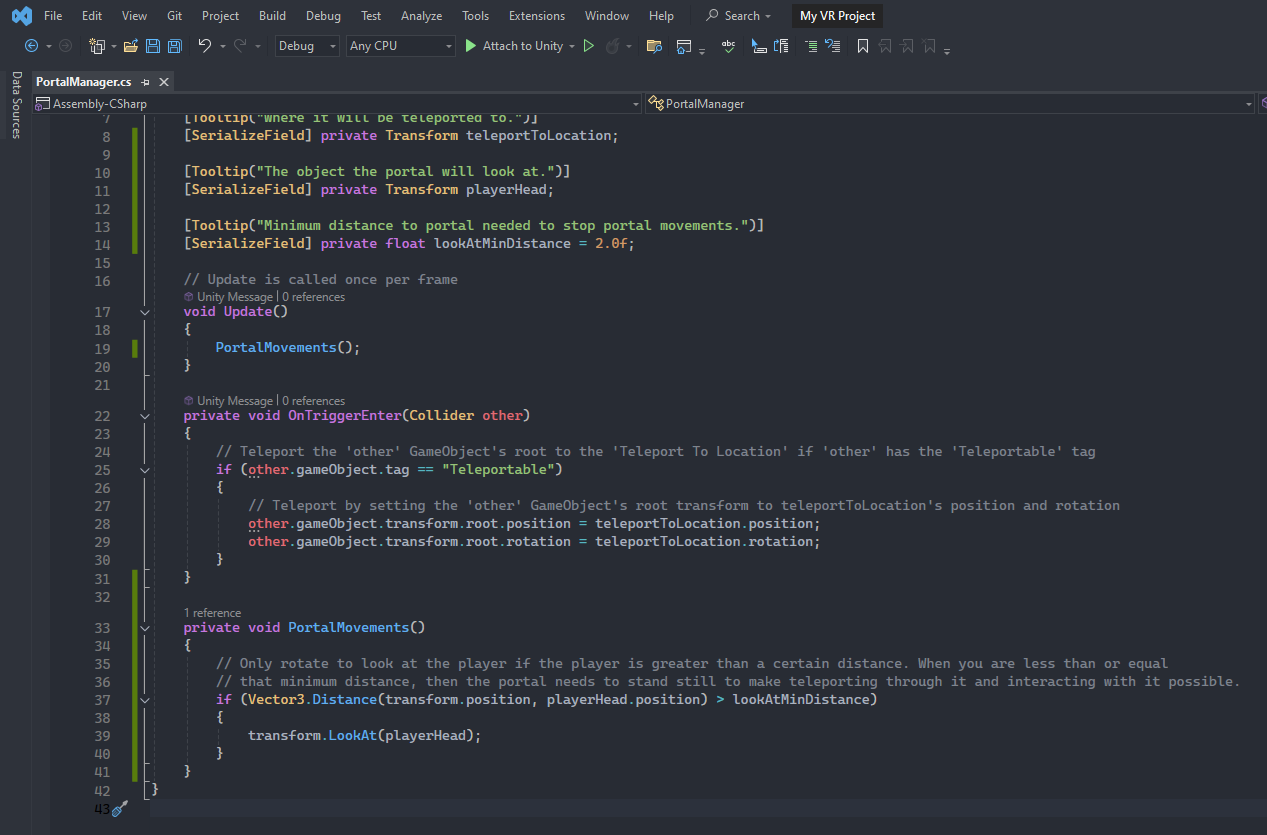
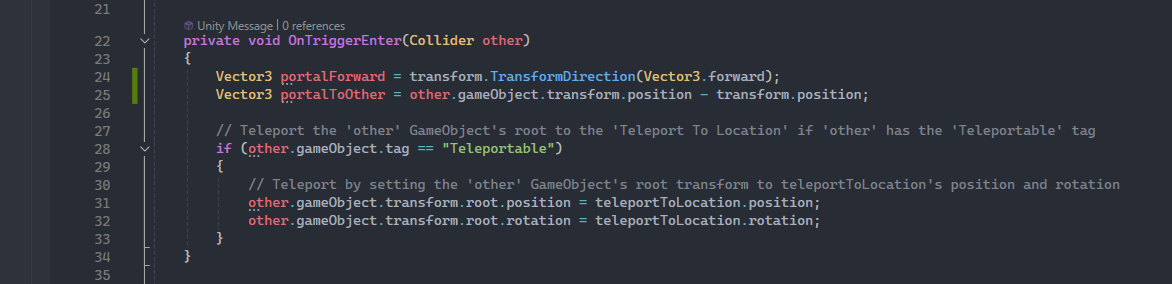
Add a OnTriggerEnter(Collider other) function, this will be called any time a GameObject that has a collider with ‘Is Trigger’ collides with the collider of the GameObject this Script is attached to. That of course being the Portal GameObject’s box collider (also set to ‘Is Trigger’).
All the colliders that collide with the Portal are temporarily saved as ‘other’ and you can access the GameObjects those ‘other’ colliders are attached to. Check if the ‘other’ collider’s GameObject has a ‘Teleportable’ tag and if it does teleport that ‘other’ GameObject’s root transform to the ‘teleportToLocation’.
We use Transform.root because without it ‘other’ is just referencing the transform of the GameObject with the collider, in our case ‘TPTrigger’. We don’t want the transform of ‘TPTrigger’ but instead the transform of ‘XROrigin’ to be able to teleport it along with all its children. Root will return the topmost transform in the hierarchy.
Save the script and back in the Editor click and drag the Teleport To Location object we created above. Now the script can reference its Transform and teleport the ‘Teleportable’ to the correct spot.
With that our simple Static Portal is done. Save everything and try it out for yourself.
Dynamic Portal
This dynamic portal moves to look at you but stands still if you are close enough to allow you to interact with it. Skip this next paragraph to go straight into building but if you’re interested here’s the reasoning behind this design choice:
In my game, portals are scattered around the level not necessarily in the sky but high enough that the player has to be in ghost/flying mode to reach them. Flying is a fun mechanic but it's sort of difficult to maneuver because of the speed (what makes it fun). My main reason for portals to look at the player was to better help them aim and hit the portal. It also mostly solved a secondary issue where they shouldn’t access the back side of the portal (more below). A final happy accident is that it made the portals look more magical, as if they were alive.
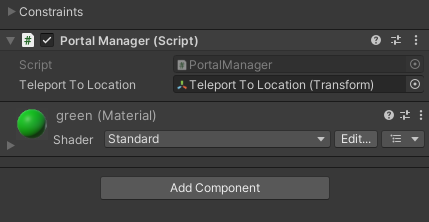
To make the portal move to look at the player we’ll need two additional variables. The first will be to keep track of the object the portal should look at, in this case the ‘Player’s Head’. We’ll also need a ‘Look at Minimum Distance’ variable so that if the player gets close enough to the portal it will stop moving. This allows the player to interact with it by removing any jittery twitchiness you’d get from the portal snapping to look at you when you’re super close and slightly moving your head.
Create a new private void function named ‘PortalMovements()’ below OnTriggerEnter() that we’ll eventually call in Update(). In the function check to see if the Vector3.Distance() between the transform.position (transform of the object this script is attached to aka the Portal) and the playerHead is greater than the lookAtMinDistance. If it is then use Transform.LookAt() to make the portal look at the playerHead.
Save the script and back in the Editor click and drag the Main Camera into the Player Head slot we created in script so that we now have a reference to its Transform. Feel free to play around with the Look at Min Distance, 2.0f worked good for me. Save, run, and play. It should look a bit like this.
Our portal now works better but there is a minor issue, you can still teleport if you approach the portal from the back side while inside the minimum distance. This is because the colliders can still overlap thus registering a collision.
There are a couple fixes, the first and easiest would be to add a thicker backing to the portal so that an object will be stopped by it and not hit the portal’s collider. This may be the solution for you, I couldn’t use this because my portals are thin polaroids. A second solution, that I used for a while, was to check if the player was in front of the portal and if they weren’t then I would snap the portal to face them. I didn’t like this as much because I know players are immensely curious and would hate not being able to see the back side of the portal. My current solution is instead to check if the object to be teleported is in front of the portal at the point of collision, that of course being OnTriggerEnter(), and then add that as a condition to determine whether or not to teleport the object.
In the OnTriggerEnter() create two new Vector3 variables. The first, ‘portalForward’, will get the forward vector of the transform this script is attached to using Transform.TransformDirection(). That is, it will get the blue forward vector of the portal seen below.
The second vector, ‘portalToOther’, can be calculated by subtracting the position of the ‘transform’ (portal) from the ‘other’ (usually ‘TPTrigger’ from above with the ‘Teleportable’ tag) collider. This vector’s direction points out from the portal to the other collider.
Create a new bool variable named ‘inFrontOfPortal’ and set it equal to the result of the conditional statement below. Use the result of boolean ‘inFrontOfPortal’ as a second condition in the if statement that determines whether or not to teleport the ‘other’ object .
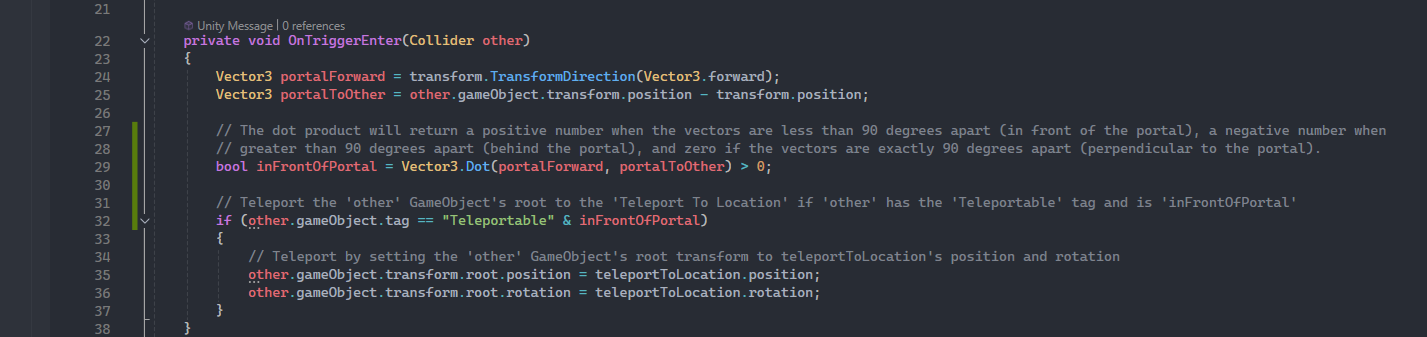
What we're doing here is finding the dot product (Vector3.Dot) between the vectors ‘portalForward’ and ‘portalToOther’, in that order. The dot product will return a positive number, negative number, or zero. We can use the sign on the number to determine whether the end position of the second vector is in front, behind, or perpendicular to the front side of the perpendicular plane to the first vector (the perpendicular plane to the ‘portalForward’ vector is the same plane the the portal is on). A positive number is returned when the two vectors are less than 90 degrees apart (in front of the portal), a negative number when they are greater than 90 degrees apart (behind the portal), and zero if the vectors are exactly 90 degrees apart (perpendicular to the portal). Here is a dot product visualization that I hope helps (the red vector is ‘portalForward’ and the blue is ‘portalToOther’).
That’ll do it for preventing teleportation from the back side of the portal while allowing it from the front. Save your script and run your project. Test it by approaching from both sides. It should be working like this:
5 - Ideas and Improvements
[1] Linking up to portals. Easy enough just add a second portal. Issue here would be preventing the second portal you teleport to from immediately teleporting you back. A disabling timer might work but then there would be a portal cooldown preventing other objects from teleporting at the same time. Slightly better solution would be to add a script to all teleportable objects and after teleporting they are disabled from teleporting for a bit and can only teleport again after a OnTriggerExit() from the second portal. Or minecraft it and just use a countdown at the second portal before taking you back.
[2] Portal respects the location of where an object collides into the first portal and it spits out the object from the same location on the second portal. My idea would be to get the location of the collision in world space and translate it to a 2D Vector in local space with respect to the portal. Assuming the second portal is the same size (if not use multiple to rescale to correct size), use the 2D Vector with respect to that second portal in local space and then translate that position to a 3D Vector in worldspace and split out the object. That's sort of how I create ripples in the portal along with a shader to show the ripples. Exceptions include objects that need to stay grounded (XROrigin). They’ll have to ignore the Y height component and continue to be teleported to the ground in front of the portal.